
Main Courses
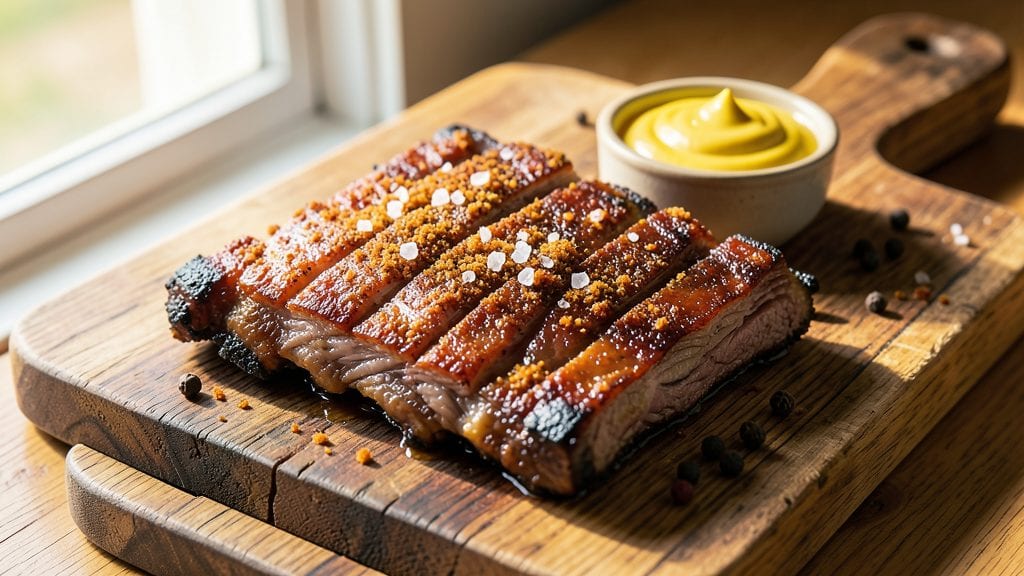
This baked dry ribs recipe delivers restaurant-quality results with crispy edges and tender meat—no messy sauce required. After years of experimenting with different methods, I perfected this technique that transforms tough ribs into smoky, flavorful bites without relying on sticky coatings.
The secret lies in a precise blend of spices and a high-heat baking approach that creates that coveted crunch.
The process is straightforward yet yields professional results: ribs are seasoned with a dry rub, baked until tender, then finished with a quick broil for maximum crispiness. Unlike traditional smoked ribs, this method uses an oven instead of a smoker, making it accessible for home cooks with minimal equipment.
The flavor profile is bold and smoky, with just enough heat to satisfy without overwhelming.
What sets these ribs apart is their texture—crispy on the outside, perfectly tender on the inside, with a bark that shatters at every bite. The dry rub penetrates deeply during the long bake, ensuring every piece is infused with flavor.
This technique works equally well for baby back or St. Louis-style ribs, making it versatile for any occasion.
Serve these ribs with classic sides like garlic mashed potatoes, coleslaw, or cornbread to complete the meal. The crispy exterior holds up beautifully for plating, and the smoky aroma will have everyone at the table asking for seconds. Let’s get started on creating ribs that stand out from the crowd.
Ingredients for baked dry ribs
Four pounds of meaty ribs plus a precise dry rub blend for restaurant-style crunch and smoky flavor.
| Ingredient | Amount | Notes |
|---|---|---|
| Ribs (Baby Back or St. Louis-Style) 🍖 | 4 lb | Bone-in, meaty cuts preferred |
| Yellow Mustard 🍯 | ¼ cup | For base coating before rub |
| Coarse Kosher Salt 🧂 | ½ cup | Diamond Crystal preferred |
| Smoked Paprika 🌶️ | ¼ cup | For deep smoky flavor |
| Black Peppercorns 🌶️ | 2 tbsp | Freshly cracked for intensity |
| Brown Sugar 🍚 | ¼ cup | Light or dark brown |
| Garlic Powder 🧄 | 1 tbsp | Freshly ground preferred |
| Onion Powder 🧅 | 1 tbsp | For balanced depth |
| Ground Cumin 🌿 | 1 tsp | Toasted for warmth |
| Chili Powder 🔥 | 1 tsp | Adjust for heat preference |
| Cayenne Pepper 🔥 | ½ tsp | Optional for extra heat |
| Extra-Virgin Olive Oil 🫒 | 2 tbsp | For crispy bark development |
| Apple Cider Vinegar 🍎 | 1 tbsp | For tenderizing |
The ribs are the star here—baby back or St. Louis-style both work, but look for cuts with good meat-to-bone ratio. Costco or local butchers often have the best quality at competitive prices. If buying frozen, thaw overnight in the fridge, not under running water. The mustard coating is non-negotiable—it helps the rub stick and adds subtle tang. For the smoked paprika, Penzeys or McCormick brands deliver consistent quality. Freshly cracked black peppercorns make all the difference compared to pre-ground powder, but if you're short on time, a quick toast in a dry skillet works.
No smoked paprika? Chipotle powder or a mix of regular paprika and a pinch of liquid smoke gets you close. Running low on brown sugar? Honey or maple syrup at half the amount works in a pinch. The apple cider vinegar can be swapped for red wine vinegar if that's what you have. For extra tenderness, pound the ribs lightly before seasoning—don't overdo it, just enough to even out thickness. The olive oil should be high-quality; California avocado oil works too if you prefer a neutral taste. If you're making this ahead, prep the ribs and rub the night before—they'll taste even better after resting.
Store uncooked ribs in the fridge for up to 3 days or freeze for 3 months. Once cooked, ribs reheat beautifully—wrap tightly in foil and bake at 300°F for 15 minutes. The crispy bark softens when reheated, so broil for 2-3 minutes after unwrapping for renewed crunch. Portion leftovers into airtight containers with a paper towel to absorb moisture. These ribs freeze exceptionally well—portion before freezing for easy reheating later. The dry rub keeps indefinitely in an airtight container away from light.
Why You'll Love This Recipe
- Foolproof Prep: I swear by this—just slather those ribs with mustard, sprinkle salt and smoked paprika, then bake. No brining, no messy sauces, no stress. The mustard caramelizes into a sticky, tangy crust that takes care of itself.
- Smoky Tangy Magic: That yellow mustard isn’t just glue—it’s the secret. The heat draws out all the meaty goodness while the smoked paprika adds this deep, woodsy warmth. The ribs stay juicy inside with a crispy, caramelized edge that’s dangerously addictive.
- Tailgate or Tuesday: Between us, these ribs work for everything. Pack them for a picnic, serve them at a game, or just eat them straight from the oven with a cold beer. (Yes, even on a Tuesday night.) They’re hearty enough for a crowd but simple enough for two.
- No-Waste Feast: Three ribs per person leaves you with leftovers that taste even better the next day. Wrap them in foil, reheat in the oven, and suddenly you’ve got lunch or dinner covered—no takeout needed. My wallet and my family thank me.
Step-by-step instructions for baked dry ribs
Here's how to achieve perfectly crispy, smoky ribs without the messy sauce.
Prepare the Ribs for Maximum Flavor
Remove the ribs from the refrigerator and let them sit at room temperature for 30 minutes before cooking. This ensures even cooking throughout the meat. Pat the ribs dry completely with paper towels—any moisture left on the surface will prevent the rub from sticking properly and create steam instead of crispy bark.
In a small bowl, combine 1 tablespoon apple cider vinegar with 0.25 cup yellow mustard. Brush this mixture generously over all sides of the ribs, including the bone side. The vinegar helps tenderize the meat while the mustard creates a sticky base for the dry rub to adhere. Let the ribs rest for 10 minutes while you prepare the spice blend.
Create the Dry Rub and Coat the Ribs
In a large bowl, mix together 0.5 cup coarse kosher salt, 0.25 cup smoked paprika, 2 tablespoons freshly cracked black peppercorns, 0.25 cup brown sugar, 1 tablespoon garlic powder, 1 tablespoon onion powder, 1 teaspoon ground cumin, 1 teaspoon chili powder, and 0.5 teaspoon cayenne pepper. Use your hands to thoroughly combine all ingredients until the mixture is uniform in color and texture.
Generously coat the ribs with the dry rub, pressing it firmly into the meat so it adheres well. Pay special attention to the ribs' meaty areas and any crevices where the rub might not reach. The rub should look thick and well-distributed—this ensures maximum flavor penetration and crispy bark development. Place the rubbed ribs on a wire rack set over a baking sheet to allow air circulation on all sides.
Bake Until Crispy and Tender
Preheat your oven to 275°F. This lower temperature is crucial for slow cooking that renders fat and collagen without drying out the meat. Place the prepared ribs on the middle rack of your oven and bake for 2 hours, without disturbing them. The ribs should develop a deep mahogany color and a crispy exterior during this time.
After 2 hours, increase the oven temperature to 325°F and continue baking for another 1 hour. This second stage helps finish cooking the meat while maintaining the crispy bark. The ribs are done when they reach an internal temperature of 195-203°F and the meat easily pulls away from the bones. You'll notice the ribs have a glossy sheen and a deep, smoky aroma.
Rest and Serve
Remove the ribs from the oven and let them rest on a cutting board for 15-20 minutes before serving. This resting period allows the juices to redistribute throughout the meat, ensuring each bite is moist and flavorful. During this time, the ribs will retain their crispy exterior while the internal temperature rises slightly.
Slice the ribs between the bones and serve immediately. The result should be tender, fall-off-the-bone meat with a crispy, flavorful bark. The dry rub creates a perfect balance of smoky, spicy, and slightly sweet flavors without any messy sauce. Pair these ribs with your favorite sides for a complete meal.
Pro Tips For Making Baked Dry Ribs
- Preheat Until Scalding: Your oven needs to hit 450°F and stay there for at least 10 minutes before the ribs go in—no exceptions. I learned this the hard way when my first batch of dry ribs came out with sad, pale edges. That extra heat jumpstarts the crust formation, and once you crack the oven open, the temp drops like a rock. Don’t rush it.
- Mustard First, Then Salt: Slather that yellow mustard on before you salt the ribs. The acid in the mustard helps tenderize the meat, but if you salt first, you’ll end up with a salty, sticky mess that clumps instead of sticking. Trust me, this isn’t the time to improvise the order.
- Skip the Overcrowding: If your baking sheet can’t fit the ribs in a single layer without touching, you’re doing it wrong. Crowded ribs steam instead of crisp, and that’s a one-way ticket to soggy disappointment. Use two sheets if you have to—your future self will thank you when you bite into that perfect snap.
- Peppercorns, Not Powder: Whole black peppercorns on the ribs add texture and flavor that ground pepper just can’t match. Crush a few directly onto the meat before baking—it’s more effort, but it makes a real difference, especially when you’re going for that dry-rub crunch. (Yes, even if you’re impatient like me.)
Make-ahead tips for this baked dry ribs
Prep Ahead Strategy
The dry rub can be mixed in advance and stored in an airtight container for up to 3 months—perfect for when you're ready to cook. I like to make a big batch and keep it on hand for quick rib nights.
The ribs themselves can be seasoned and refrigerated overnight, allowing the flavors to meld deeply before baking. This extra step makes a noticeable difference in taste. 💡
Overnight Prep for Maximum Flavor
Season the ribs and store them uncovered in the fridge for 12-24 hours before cooking. This allows the rub to penetrate the meat thoroughly, creating a more intense flavor profile. Just make sure to cover them loosely with plastic wrap to prevent drying out.
I usually prep mine the night before and let them sit uncovered on a wire rack for the best results. The longer they rest, the better they taste.
Freezing Uncooked Ribs
If you're planning ahead, you can freeze the seasoned ribs for up to 3 months. Wrap them tightly in plastic wrap followed by foil, then place in a freezer bag to prevent freezer burn.
When ready to cook, thaw them in the fridge overnight. The texture and flavor remain excellent after freezing, making this a great make-ahead option for busy weeks. ❄️
Reheating Leftovers
Leftover ribs reheat best when wrapped in foil and baked at 300°F for 15 minutes. For extra crispiness, broil for 2-3 minutes after unwrapping. To maintain moisture, add a splash of apple cider vinegar or beef broth before reheating.
The bark won't be as crispy as fresh, but it's still delicious. Store leftovers in airtight containers with a paper towel to absorb excess moisture.
Portioning for Easy Serving
Slice the ribs between the bones before freezing or storing to make serving easier later. Portion them into individual meal-sized containers with a side of garlic mashed potatoes or coleslaw for quick reheating.
This way, you can grab and go without dealing with a whole rack of ribs. I always prep extra portions for lazy weeknights when I don’t feel like cooking from scratch. 🍽️
Sauce-Free Flexibility
One of the best things about dry ribs is their versatility—they pair perfectly with almost any side or sauce. Store them in the fridge for up to 4 days and serve with BBQ sauce, horseradish cream, or even fruit salsa for a sweet and tangy contrast.
The clean flavor of the ribs lets the sides shine, so get creative with your pairings! 💛
Nutrition facts
Frequently asked questions
Why do I need to pat the ribs completely dry before seasoning?
Moisture creates steam instead of crispy bark during baking. Patting dry ensures the dry rub sticks perfectly and develops that coveted crunch. Any remaining moisture will dilute the seasoning and prevent proper bark formation.
Can I use a different type of sugar in the dry rub?
Yes! Brown sugar can be swapped for white sugar (same amount) or honey/maple syrup (reduce by half). The sugar helps caramelize during baking, creating that sweet-savory crust. Just adjust other spices if you prefer less sweetness.
How do I know when the ribs are fully cooked?
Use a meat thermometer to check for an internal temperature of 195-203°F. The meat should pull away from bones easily, and the bark should be deep mahogany with crispy edges. If they're not tender enough, return to the oven for 30 more minutes at 325°F.
What's the best way to restore crispiness after reheating?
Broil for 2-3 minutes after unwrapping—keep a close eye to avoid burning. Add a splash of apple cider vinegar before reheating to maintain moisture. The bark won't be as crisp as fresh, but this trick helps significantly. Store leftovers in airtight containers with a paper towel.
Can I make this recipe in an electric smoker?
Use the same dry rub and cook at 225°F for 4-5 hours until tender. The smoker adds extra depth, but the oven method still delivers great results with less equipment. For smoker ribs, wrap in foil after 2 hours to speed up cooking.