
Side Dishes
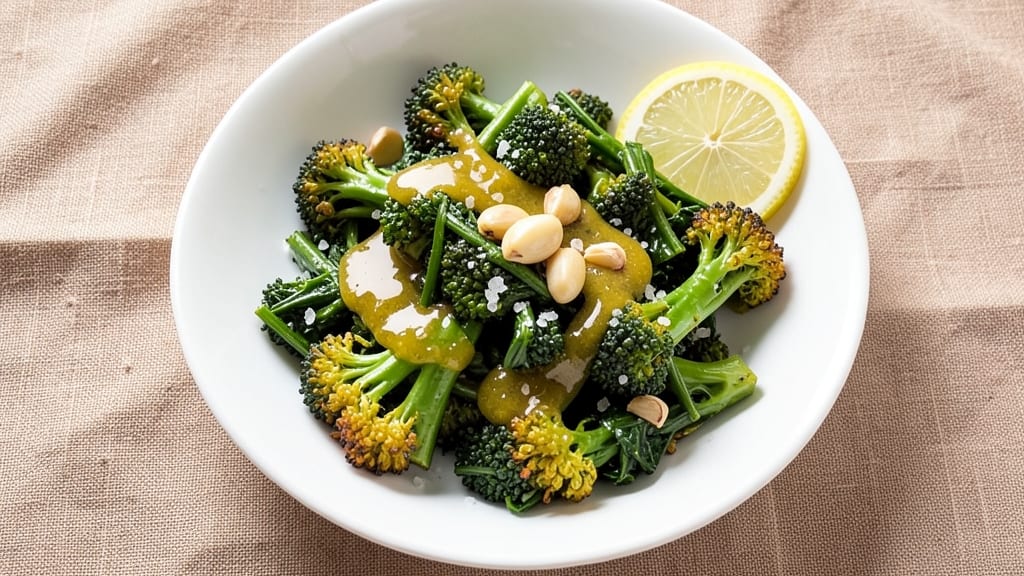
Transforming broccoli greens into a crispy, flavorful side dish is simpler than you think—this one-pan garlic butter roast delivers restaurant-quality results with minimal effort.
Standing on a step stool in my grandmother’s kitchen in Sicily, I learned how to elevate humble ingredients with just a few key techniques, and this recipe does exactly that.
The secret lies in high heat and proper seasoning, turning bitter greens into golden, crispy perfection that pairs beautifully with any main dish.
What makes this recipe stand out is the foolproof method that requires just one pan and 20 minutes of active time. You’ll start by prepping the greens properly—chopping them into even pieces so they cook uniformly—and then roast them until the edges are crispy and caramelized.
A splash of lemon juice brightens the dish, while garlic butter adds rich, savory depth that makes every bite irresistible. This technique works equally well as a standalone side or alongside grilled meats, fish, or even vegetarian mains.
The result is a dish that’s tender yet crispy, with a golden-brown finish that’s impossible to resist. The garlic butter infuses the greens with aromatic flavor, while the crispy edges add a satisfying texture that balances the softness inside.
It’s the kind of side that turns a simple meal into something special—no fuss, just flavor. Ready to elevate your dinner table? Let’s get started.
This recipe is particularly versatile for vegetarians, as it delivers hearty texture and bold flavor without relying on meat. The method also works well for meal prepping—simply reheat the greens in the oven or air fryer to restore that crispy edge.
Pair it with roasted potatoes, a grilled steak, or even as a bed for a plant-based protein dish. The possibilities are endless, but the technique remains the same: simple, effective, and delicious.
Ingredients for broccoli greens
Nine simple ingredients transform bitter broccoli greens into crispy, golden perfection with restaurant-quality flavor.
| Ingredient | Amount | Notes |
|---|---|---|
| Broccoli Greens 🥦 | 6 cups | Chopped into 1-inch pieces |
| Unsalted Butter 🧈 | 4 tbsp | Cold, cut into small cubes |
| Garlic Cloves 🧄 | 4 cloves | Minced, fresh preferred |
| Lemon Juice 🍋 | 1 tbsp | Freshly squeezed |
| Extra-Virgin Olive Oil 🫒 | 1 tbsp | For tossing greens |
| Sea Salt 🧂 | 1 tsp | Fine grain preferred |
| Ground Black Pepper 🌶️ | ½ tsp | Freshly cracked |
| Dried Italian Seasoning 🌿 | ½ tsp | Or 1 tsp fresh chopped parsley |
| Red Pepper Flakes 🌶️ | ¼ tsp | Optional for heat |
The broccoli greens are the star—look for bright green, fresh stems at the market. Whole Foods or Trader Joe's often carry pre-trimmed greens, but trimming yourself ensures you get the best texture. The key is even chopping: 1-inch pieces cook uniformly and develop crispy edges. If using frozen greens, thaw and pat completely dry before roasting—moisture ruins crispiness. For extra flavor, save the stems and pulse them in a food processor for a pesto-like garnish.
No fresh garlic? Garlic powder at half the amount works, but fresh is ideal. Short on butter? Olive oil works 1:1, though butter adds richness. The Italian seasoning can be swapped for 1/4 tsp each dried oregano, thyme, and basil. Love heat? Add cayenne to taste alongside the red pepper flakes. For meal prep, roast an extra batch and store in airtight containers—reheat in a skillet or oven to restore crispiness. The lemon juice can be omitted if you prefer a richer flavor, but it brightens the dish beautifully.
This dish reheats perfectly—simply toss with a splash of water and roast at 425°F for 3-5 minutes until crispy again. Store in the fridge for 4-5 days or freeze for up to 3 months. For best texture, avoid microwaving. The garlic butter can be prepped ahead and stored in the fridge for 1 week. When serving, sprinkle with extra lemon zest or fresh parsley for a pop of color and freshness.
Why You'll Love This Recipe
- I’ll be real: this is my go-to when I’m pinching pennies but still want flavor. Broccoli greens are free (if you’re buying whole heads), and a little butter and olive oil stretch a long way. Leftovers? They reheat like a dream for lunches all week.
- Uses Every Bit: I swear by this recipe because it turns something often tossed into the compost—broccoli greens—into a dish that actually gets eaten. That bright, peppery flavor? It’s like a secret weapon for using up those scraps without waste.
- Garlic-Lemon Magic: Between us, the combo of browned butter and fresh garlic with a squeeze of lemon takes these greens from "side dish" to "main event." The acidity cuts through the richness, and suddenly, you’ve got something that tastes like it belongs on a restaurant menu.
- One-Pan, Zero Stress: Honestly, it’s the kind of recipe where you can have dinner on the table while scrolling through your phone. Sauté the greens, add the butter and garlic, finish with lemon—boom. Done. No fancy techniques, no extra pots.
Step-by-step instructions for garlic butter roasted broccoli greens
This method delivers perfectly crispy edges while keeping the greens tender and infused with rich garlic flavor.
Prep the Broccoli Greens for Even Cooking
Spread the 6 cups of chopped broccoli greens on a clean kitchen towel and pat them completely dry. Removing all moisture is critical for achieving crispy edges later. I like to work in batches if needed, using another towel for stubborn spots. Once dry, transfer the greens to a large mixing bowl.
Drizzle the greens with the 1 tablespoon of extra-virgin olive oil and toss gently with your hands until they're evenly coated. This helps the seasonings adhere and prevents sticking during roasting. Add the 1 teaspoon of sea salt, 0.5 teaspoon of ground black pepper, and 0.5 teaspoon of dried Italian seasoning to the bowl. Mix thoroughly so every piece gets an even distribution of seasoning.
Create the Garlic Butter Mixture
In a small bowl, combine the 4 tablespoons of cold, cubed unsalted butter with the 4 cloves of minced garlic. Add the 1 tablespoon of freshly squeezed lemon juice and the 0.25 teaspoon of red pepper flakes (if using). Mix with a fork until the butter and garlic form a thick, pea-sized paste. This mixture will create the rich, flavorful coating that makes this dish special.
I prefer to keep the butter cold until the last moment—this ensures it melts beautifully during roasting rather than turning greasy. If your kitchen is warm, you can chill the mixture briefly while you prepare the baking sheet.
Arrange Greens on the Baking Sheet
Preheat your oven to 425°F while you work. Line a large, rimmed baking sheet with parchment paper for easy cleanup. Spread the seasoned greens in an even layer on the sheet, leaving about 1 inch between pieces. This spacing allows hot air to circulate and creates those coveted crispy edges.
Here's where it gets important: sprinkle the garlic butter mixture evenly over the greens. I like to use my fingers to gently press the butter cubes into the greens, ensuring they make contact with as many pieces as possible. This direct contact is what creates the signature crispy texture and rich flavor.
Roast Until Golden and Crispy
Place the baking sheet in the preheated oven and roast for 18-22 minutes, depending on your oven. You're looking for the edges to turn deep golden brown while the stems remain tender. I usually start checking at the 18-minute mark—this is when you'll see the magic happen.
The greens should smell incredibly aromatic by this point, with that irresistible garlic butter fragrance filling your kitchen. If you peek and see some pieces browning faster than others, gently rotate the pan for even cooking. The perfect result is crispy edges that hold their shape when lifted with tongs, with tender stems that yield slightly when pierced with a fork.
Finish with Fresh Lemon and Serve Immediately
Remove the roasted greens from the oven and transfer them to a serving platter. Immediately drizzle with any remaining garlic butter from the pan, using a spoon to scrape up all the flavorful bits from the bottom. Finish with a squeeze of fresh lemon juice—this brightens the flavors and cuts through the richness of the butter.
Serve while still hot for maximum crispiness. The greens should be vibrant green with those beautiful golden-brown edges, and every bite should deliver a perfect balance of crispy texture and tender interior. This dish pairs beautifully with grilled meats, roasted chicken, or even as a flavorful side to fish.
Pro Tips For Making Broccoli Greens
- Wilt First, Then Sear: Broccoli greens release water like a sad sponge when chopped—start by wilting them in a dry pan over medium-high heat for 3-4 minutes. Once they collapse and release most of their moisture, add the butter and garlic. This prevents a soggy, steamed mess and guarantees a crisp-tender finish.
- Mince Garlic Like You Mean It: Skip the lazy chop—mince your garlic very finely (almost paste-like) so it blends into the butter instead of sitting as chunks. I used to burn garlic because it stuck to my knife, so now I smash cloves with the flat side of my knife first, then mince. Trust me, your nose will thank you.
- Don’t Rush the Butter: Let that unsalted butter melt slowly over low heat—no, really, turn it down or walk away for a minute. If you rush it, you’ll end up with browned butter bits instead of a smooth, flavorful base. Once it’s fully melted, toss in the greens and garlic to coat everything evenly.
- Zest Before Juicing: Grab a strip of lemon zest and toss it in before adding the juice—it adds a bright, aromatic punch without making the dish taste like a science experiment. I learned this after serving a plate where the lemon flavor felt flat. (Yes, even if you’re impatient like me.)
Health benefits of this dish
Rich in Fiber
Broccoli greens are a fiber powerhouse, offering about 5 grams of fiber per cup—that’s 20% of your daily needs! Fiber supports digestive health, keeps you feeling full longer, and helps regulate blood sugar.
My Nonna always said, "A happy gut means a happy life," and I’ve seen firsthand how this simple green can make a difference in digestion. 💪
Packed with Vitamin K
Just 1 cup of broccoli greens delivers a whopping 160% of your daily vitamin K, which is essential for blood clotting and bone health. Vitamin K also works with calcium to strengthen bones—a perfect pairing for anyone looking to maintain strong skeletal health as they age.
I add these greens to my meals at least twice a week to keep my bones healthy.
Antioxidant Powerhouse
Broccoli greens are loaded with antioxidants like sulforaphane and quercetin, which help combat inflammation and oxidative stress in the body. Sulforaphane, in particular, has been linked to reduced cancer risk, making this a superfood worth adding to your plate.
I love how these greens transform from bitter to sweet when cooked properly, making them easier to enjoy regularly.
Supports Heart Health
The potassium in broccoli greens helps regulate blood pressure by counteracting the effects of sodium. A 1-cup serving provides about 800mg of potassium, which is nearly 20% of your daily requirement.
This makes it a fantastic addition to heart-healthy diets. I often pair these greens with lean proteins to create balanced, heart-friendly meals.
Boosts Immunity
Loaded with vitamin C (about 80mg per cup) and vitamin A, broccoli greens give your immune system a serious boost. Vitamin C helps with collagen production and wound healing, while vitamin A supports eye health and skin integrity.
I always keep a stash of these greens on hand during cold season to keep my family healthy and strong. 🌱
Low-Calorie, High-Nutrient
With only about 35 calories per cup, broccoli greens offer maximum nutrition with minimal calories. This makes them ideal for weight management or simply adding more nutrients to your diet without extra calories.
I’ve found that roasting them with garlic butter (as in this recipe) makes them so delicious that even picky eaters reach for seconds!
Nutrition facts
Frequently asked questions
Can I use frozen broccoli greens instead of fresh?
Yes, but with one key step: thaw and pat them completely dry before roasting. Moisture prevents crispy edges, so spread them on paper towels and press gently. Frozen greens work well for this recipe—just add 2-3 extra minutes to the roasting time to account for any lingering ice crystals.
What if my broccoli greens turn out soggy instead of crispy?
This usually happens from excess moisture or insufficient heat. Next time, pat the greens extra dry and spread them in a single layer on the baking sheet. Also, ensure your oven is fully preheated to 425°F—hotter air creates crispiness. For extra insurance, broil for 1-2 minutes at the end.
How can I make this recipe spicier?
Double the red pepper flakes to 0.5 teaspoon or add 1/4 teaspoon of cayenne pepper. For a smoky kick, sprinkle with 1/4 teaspoon smoked paprika before roasting. If you love heat, try a pinch of crushed chili flakes or a dash of hot sauce after roasting for a fresh zing.
Can I make this ahead of time for meal prep?
Roast the greens as directed, then store in an airtight container for up to 5 days. To restore crispiness, reheat in a 400°F oven for 5-7 minutes or air fry at 375°F for 3-4 minutes. Avoid microwaving—it kills the texture. For best results, reheat in batches to maintain even crispiness.
What’s the best way to use broccoli stems?
Don’t waste them! Pulse the stems in a food processor with 1/4 cup olive oil, 1 clove garlic, 1 tbsp lemon juice, and 1 tbsp nuts (like pine nuts or almonds) to make a quick pesto. Spread it on toast, mix into pasta, or drizzle over the roasted greens for extra flavor. It’s a game-changer for reducing food waste!