
Side Dishes
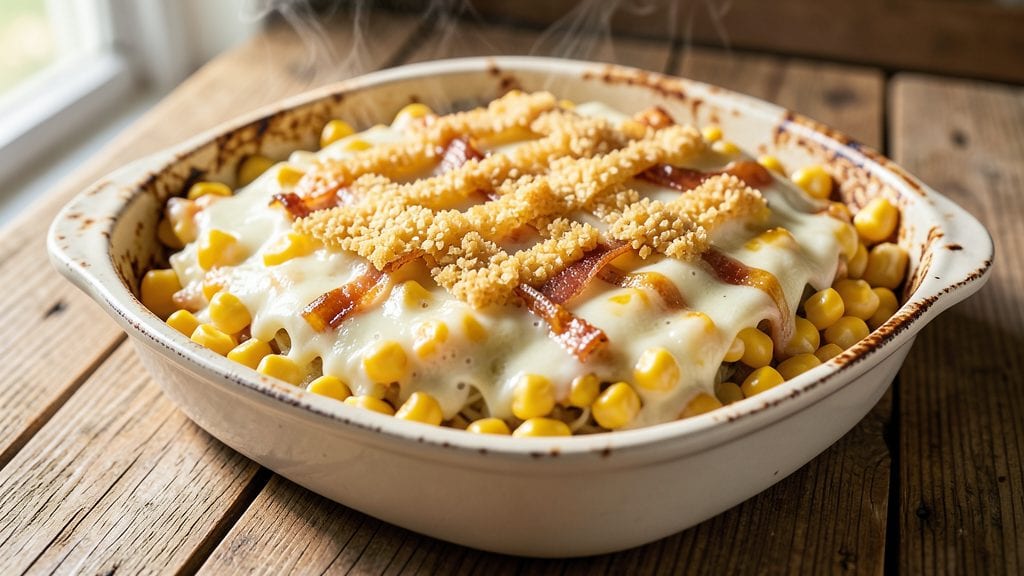
This Grandma's scalloped corn recipe brings back the golden, creamy comfort of family dinners—layered with sharp cheddar and buttery corn until the top turns crisp and inviting. 💛 Growing up in a Boston triple-decker, I learned this dish was always the centerpiece at Sunday suppers, served in a buttered baking dish straight from the oven.
The secret lies in the slow bake, where corn kernels soften just enough while the cheese melts into a velvety blanket.
The recipe relies on simple ingredients you likely already have: fresh or frozen corn, sharp cheddar, heavy cream, and a touch of flour to thicken the mixture. Preheating the baking dish ensures even cooking, while a sprinkle of breadcrumbs on top adds that signature crunch.
This isn’t just a side dish—it’s a nostalgic hug in a casserole, perfect for holidays or weeknight dinners when you crave something hearty and familiar.
By the time it emerges from the oven, you’ll have a dish that’s golden on top, creamy in the middle, with tender corn kernels peeking through the melted cheese.
The aroma alone will have everyone gathered around the table, and the first bite delivers that perfect balance of crispy, cheesy, and buttery goodness. It’s the kind of comfort food that turns ordinary meals into memories.
Serve it as a standalone side or pair it with roasted meats for a complete meal. The leftovers reheat beautifully, making it ideal for meal prep. Let’s bring a little taste of Grandma’s kitchen to your table.
Ingredients for grandmas scalloped corn
Pantry staples and a few key ingredients transform into Grandma's legendary cheesy, crisp-topped comfort.
| Ingredient | Amount | Notes |
|---|---|---|
| Fresh or Frozen Corn Kernels 🌽 | 3 cups | Thawed if frozen, drained well |
| Sharp White Cheddar Cheese 🧀 | 2 cups | Freshly grated from block |
| Heavy Cream 🥛 | 1 cup | Full-fat for creaminess |
| All-Purpose Flour 🌾 | ¼ cup | For thickening mixture |
| Unsalted Butter 🧈 | ½ cup | Melted for baking dish |
| Panko Breadcrumbs 🍞 | ¼ cup | For crispy topping |
| Salt 🧂 | ½ tsp | Adjust to taste |
| Black Pepper 🌶️ | ¼ tsp | Freshly ground preferred |
| Garlic Powder 🧄 | ½ tsp | For subtle flavor boost |
| Milk 🥛 | ½ cup | Warm for smooth blend |
| Butter (for baking dish) 🧈 | 2 tbsp | Melted for coating |
The cheddar is non-negotiable—sharp white cheddar from the deli section (the kind that’s still in a wedge) gives that tangy punch. Trader Joe's or Whole Foods carry great options, but any block cheese works if you grate it yourself. Fresh corn is ideal, but frozen works perfectly—just thaw and drain well. The butter? Use European-style if you can—it’s higher in fat, so the topping gets extra crispy. I always melt the butter for the baking dish first—just enough to coat the bottom so it doesn’t stick. Pro tip: preheat your dish in the oven while you’re prepping the filling.
No sharp cheddar? Pepper jack adds a kick, or Colby Jack for a milder taste. Running low on heavy cream? Half-and-half in a pinch (though the texture won’t be quite as rich). The flour is just to thicken the sauce—Diamond Crystal baking flour works best if you’re picky, but all-purpose is fine. For the breadcrumbs, panko gives that perfect crunch, but regular breadcrumbs toasted in the oven (5 minutes at 350°F) work too. The garlic powder is optional, but trust me—it elevates everything. And if you’re using frozen corn, don’t skip the draining step—wet corn makes the casserole soggy.
This reheats like a dream—better the second day if you can believe it. Store leftovers in an airtight container for up to 4 days in the fridge, or freeze portions for 3 months. For meal prep, I always make a double batch—one for dinner, one for lunches. Just pop it in the oven at 375°F for 15-20 minutes to crisp up the top. The baking dish? Cast iron or ceramic holds heat best, but glass works too. Just don’t skip the butter—that’s what makes it golden and crispy.
Why You'll Love This Recipe
- One-Pan Magic: I swear by this recipe—just dump the corn, toss in the cheese, and let the oven do the work. No chopping, no fuss, and honestly? That golden crust on top is worth every minute of hands-off time.
- Cheesy-Creamy Obsession: The sharp cheddar melts into that rich, velvety cream sauce while the butter toasts the edges just right. Between us, I’ve never met a bowl of corn that didn’t disappear faster than I could say “seconds, please.”
- Leftovers? No Problem: This dish actually tastes better the next day—yes, really. I make a double batch on Sundays, and by Wednesday, it’s the star of my lunchbox or a quick reheated dinner. (Pro tip: Microwave it covered for 30 seconds.)
- Budget-Friendly Luxury: Fresh or frozen corn? Both work, and that heavy cream + butter combo stretches into something that feels fancy without breaking the bank. My grocery bill thanks me, and so does my taste buds.
Step-by-step instructions for Grandma's scalloped corn
Here's how to make this creamy, cheesy classic with that perfect crispy breadcrumb topping.
👨🍳 Step 1: Prep the Corn and Cheese Mixture
Start by draining any excess liquid from the 3 cups fresh or frozen corn kernels if using frozen. In a large bowl, gently mix the corn with 2 cups freshly grated sharp white cheddar cheese, 0.5 tsp salt, 0.25 tsp black pepper, and 0.5 tsp garlic powder. The cheese should coat the corn evenly—this is where all that cheesy goodness comes from. I like to use my hands for this part because it helps distribute the cheese more thoroughly.
Next, warm the 0.5 cup milk in a small saucepan over medium heat until it's just hot to the touch—about 2-3 minutes. In a separate bowl, whisk together the warm milk with 1 cup heavy cream and 0.25 cup all-purpose flour. This creates a smooth, thick sauce that will bind everything together. The warm milk helps prevent lumps in the flour mixture, so don't skip this step.
🍳 Step 2: Combine and Pour into Baking Dish
Pour the warm milk-cream mixture over the corn and cheese in your bowl, then gently fold everything together until fully combined. You want the mixture to look creamy and well-coated—no dry spots of corn should remain. Transfer this to a 9x13-inch baking dish that's been lightly greased with 2 tbsp melted butter. Spread it out evenly so it's about ½-inch thick—this ensures even baking and that perfect golden crust.
Here's the thing—don't press down on the mixture. You want it to stay light and airy so it bakes up fluffy rather than dense. I always tap the baking dish gently on the counter a few times to help settle the mixture evenly before moving on to the next step.
🔥 Step 3: Create the Crispy Topping Layer
Preheat your oven to 375°F while you prepare the topping. In a small bowl, mix together 0.25 cup panko breadcrumbs with 0.5 cup unsalted butter that's been melted and cooled slightly. The butter should be warm enough to coat the breadcrumbs but not so hot it melts them completely in your hands. Sprinkle this mixture evenly over the top of the corn casserole, pressing down very lightly with the back of a spoon.
This is where the magic happens—the panko gives you that beautiful crispy texture while the butter adds richness. Don't be tempted to make the topping too thick, or it won't crisp properly. I like to make a few crisscross patterns with a knife to help create those adorable golden ridges when it bakes.
🔥 Step 4: Bake Until Golden and Bubbly
Bake uncovered for 45-50 minutes until the top is deep golden brown and the edges are bubbling. You'll know it's ready when the center still jiggles slightly but the top is crispy enough to resist when you press down gently with your finger. If it's browning too quickly, tent loosely with foil for the last 10 minutes to prevent burning.
Real talk: the first time I made this, I took it out too soon because I was afraid it would overbake. But the secret is letting it cook through completely—this ensures that creamy, cheesy texture all the way through. The dish will continue cooking slightly as it rests, so pull it out when it's just about perfect.
⏰ Step 5: Rest and Serve Warm
Let the scalloped corn rest for 10-15 minutes before serving. This resting time allows the flavors to meld together and gives the breadcrumb topping time to crisp up even more. I know it's tempting to dig in immediately, but trust me—waiting makes all the difference in the final texture.
Serve warm with a side of buttery dinner rolls or a simple green salad. Each bite should deliver that perfect combination of creamy corn, sharp cheddar, and crispy breadcrumb topping. The best part? This dish tastes even better the next day, so make extra if you can—it's pure comfort food at its finest.
Pro Tips For Making Grandmas Scalloped Corn
- Prep Corn Like a Pro: If using frozen corn, thaw it first—don’t just dump it straight from the bag. I learned this the hard way when my first batch turned out watery. For fresh, cut kernels off the cob completely—no half-moons, no uneven pieces. This ensures even cooking and a creamy texture, not a mushy mess.
- Melt Butter Slow: Don’t rush the butter—melt it over medium-low heat until it’s just foamy, not browned. I used to crank the heat, and the cream would curdle every time. Keep it gentle, or you’ll end up with a scrambled mess instead of a silky sauce.
- Skip the Crowd in the Pan: Layer the corn in a single even layer before adding the cheese-cream mix. I was always impatient and dumped everything in at once—result? A sad, uneven bake where the bottom stuck and the top stayed raw. Patience here guarantees a golden, bubbly top.
- Use Sharp Cheddar Only: Sharp white cheddar is non-negotiable—mild cheddar turns this dish into a sad, bland pudding. Grate it fresh (not pre-shredded, which clumps) and toss it with a pinch of salt before adding. Pre-shredded cheese is the fast-food version of this recipe.
Perfect pairings for these flavors
Classic Side Pairings
This scalloped corn shines alongside roasted pork chops or herb-crusted chicken thighs—the crispy breadcrumb topping contrasts beautifully with tender meats. I often serve it with garlic mashed potatoes for a New England-style feast.
For a lighter option, pair it with a simple arugula salad dressed in lemon vinaigrette to cut through the richness. 🥗
Beverage Matchups
A crisp New England IPA from a local brewery cuts through the richness perfectly, balancing the cheesy, buttery notes. For wine lovers, a Chardonnay with hints of vanilla and apple pairs wonderfully—look for one from Napa Valley or Sonoma.
If you prefer something lighter, sparkling apple cider adds a refreshing contrast during cooler months. 🍷
Holiday Centerpiece
Transform this into a Thanksgiving centerpiece by adding a layer of crispy bacon and green onions before baking. Serve it in the middle of the table with a drizzle of hot honey for that extra touch of sweetness. It’s a crowd-pleaser that feels festive yet comforting—just like Grandma’s kitchen. 🍂
Make-Ahead Meal Prep
This dish reheats beautifully, making it perfect for meal prep. Assemble it the night before and refrigerate, then bake straight from the fridge at 375°F for 50-60 minutes.
For freezer-friendly portions, bake in individual 8x8-inch pans and freeze for up to 3 months. Just thaw overnight in the fridge before reheating. ❄️
Cheesy Variations
For a spicy kick, stir in ½ tsp cayenne pepper with the cheese mixture. Want extra creaminess? Swap ½ cup of the cheddar for creamy Monterey Jack.
My favorite twist? Top with crumbled bacon and fresh chives right before serving—it adds a smoky depth that takes it to the next level. 🌶️
Nutrition facts
Frequently asked questions
Can I use frozen corn instead of fresh?
Frozen corn works perfectly—just thaw and drain it thoroughly before using. The texture stays tender when baked, and you won’t sacrifice any flavor. For best results, squeeze out all excess moisture with a clean kitchen towel to prevent a soggy casserole.
Why does my scalloped corn turn out watery?
Watery corn usually means excess liquid from under-drained frozen corn or too much milk/cream. Always drain frozen corn well, and use 1 cup heavy cream (not more) for the perfect creamy-but-not-soupy texture. If it’s still too wet after baking, broil for 2-3 minutes at the end to crisp the top.
Can I make this ahead of time?
Yes! Assemble the dish in a baking dish, cover tightly, and refrigerate for up to 24 hours before baking. For make-ahead meals, bake it straight from the fridge at 375°F for 50-60 minutes. The flavors deepen overnight, making it even more delicious.
What’s the secret to the crispy topping?
The crispy top comes from three things: panko breadcrumbs (not regular), melted butter mixed into them, and baking until golden. Press lightly with the back of a spoon, then bake uncovered until deep brown. For extra crunch, broil for 1-2 minutes at the very end.
How do I reheat leftovers?
Reheat in a 350°F oven for 15-20 minutes covered with foil, then uncover and broil for 2-3 minutes to restore crispiness. Microwave reheating works but may make the topping soggy—avoid it if you want that perfect texture. Leftovers taste even better the next day!